
Top Open Source Alternatives to Tonic AI for Data Anonymization and Synthetic Data
Top Open Source Alternatives to Tonic AI for Data Anonymization and Synthetic Data
March 31st, 2025

As an open source project, our code is available for the world to see and checkout. But as anyone who has worked in a decently large codebase knows, looking at the code and understanding how it all comes together can be two totally different things.
In this blog, I'm going to walk through how we built the SQL editor in our subsetting page using NextJS and Monaco. This blog won't go into detail on how subsetting works. If you're interested in that, check out our Subsetting blog.
These are some of my favorite blogs to write since they go in detail and walk through actual code and talk about how a feature comes together.
Let's go!
Before we jump into code, let's talk about the feature and why we wanted to build it.
A core part of the Neosync platform is the ability to subset data. This is super useful for reducing the size of a data set so that it fits locally or filtering a data set down in order to reproduce a bug in a customer's account.
We think really deeply about the developer experience at Neosync and the original subsetting experience we built was functional but could be much much better. So we set out to upgrade the developer experience and bring it up grade.
Subsetting in Neosync is really flexible and takes in a SQL command meaning that someone can write pretty much anything. So we knew right away we needed to give the user some way to validate their subset query before it ran because having to actually run a job to realize that you did something wrong is a pretty bad experience. There are two things that we need to validate when it comes to the query:
Secondly, we wanted to make the query writing experience a first class experience. We thought of two ways we can do this. The first is to use SQL-specific syntax highlighting that developers would be familiar with and the second is to use auto-complete to speed up the writing process.
One more thing to point out. When a user wants to subset their data, they select the table they want to subset first. So the user is always writing a query in the context of a table and Neosync handles all of the relational integrity (if applicable).
For ex. if I have a users table, and I want to subset my data to all of the users who have signed up in the last month, I would select the users table and write a query like this:
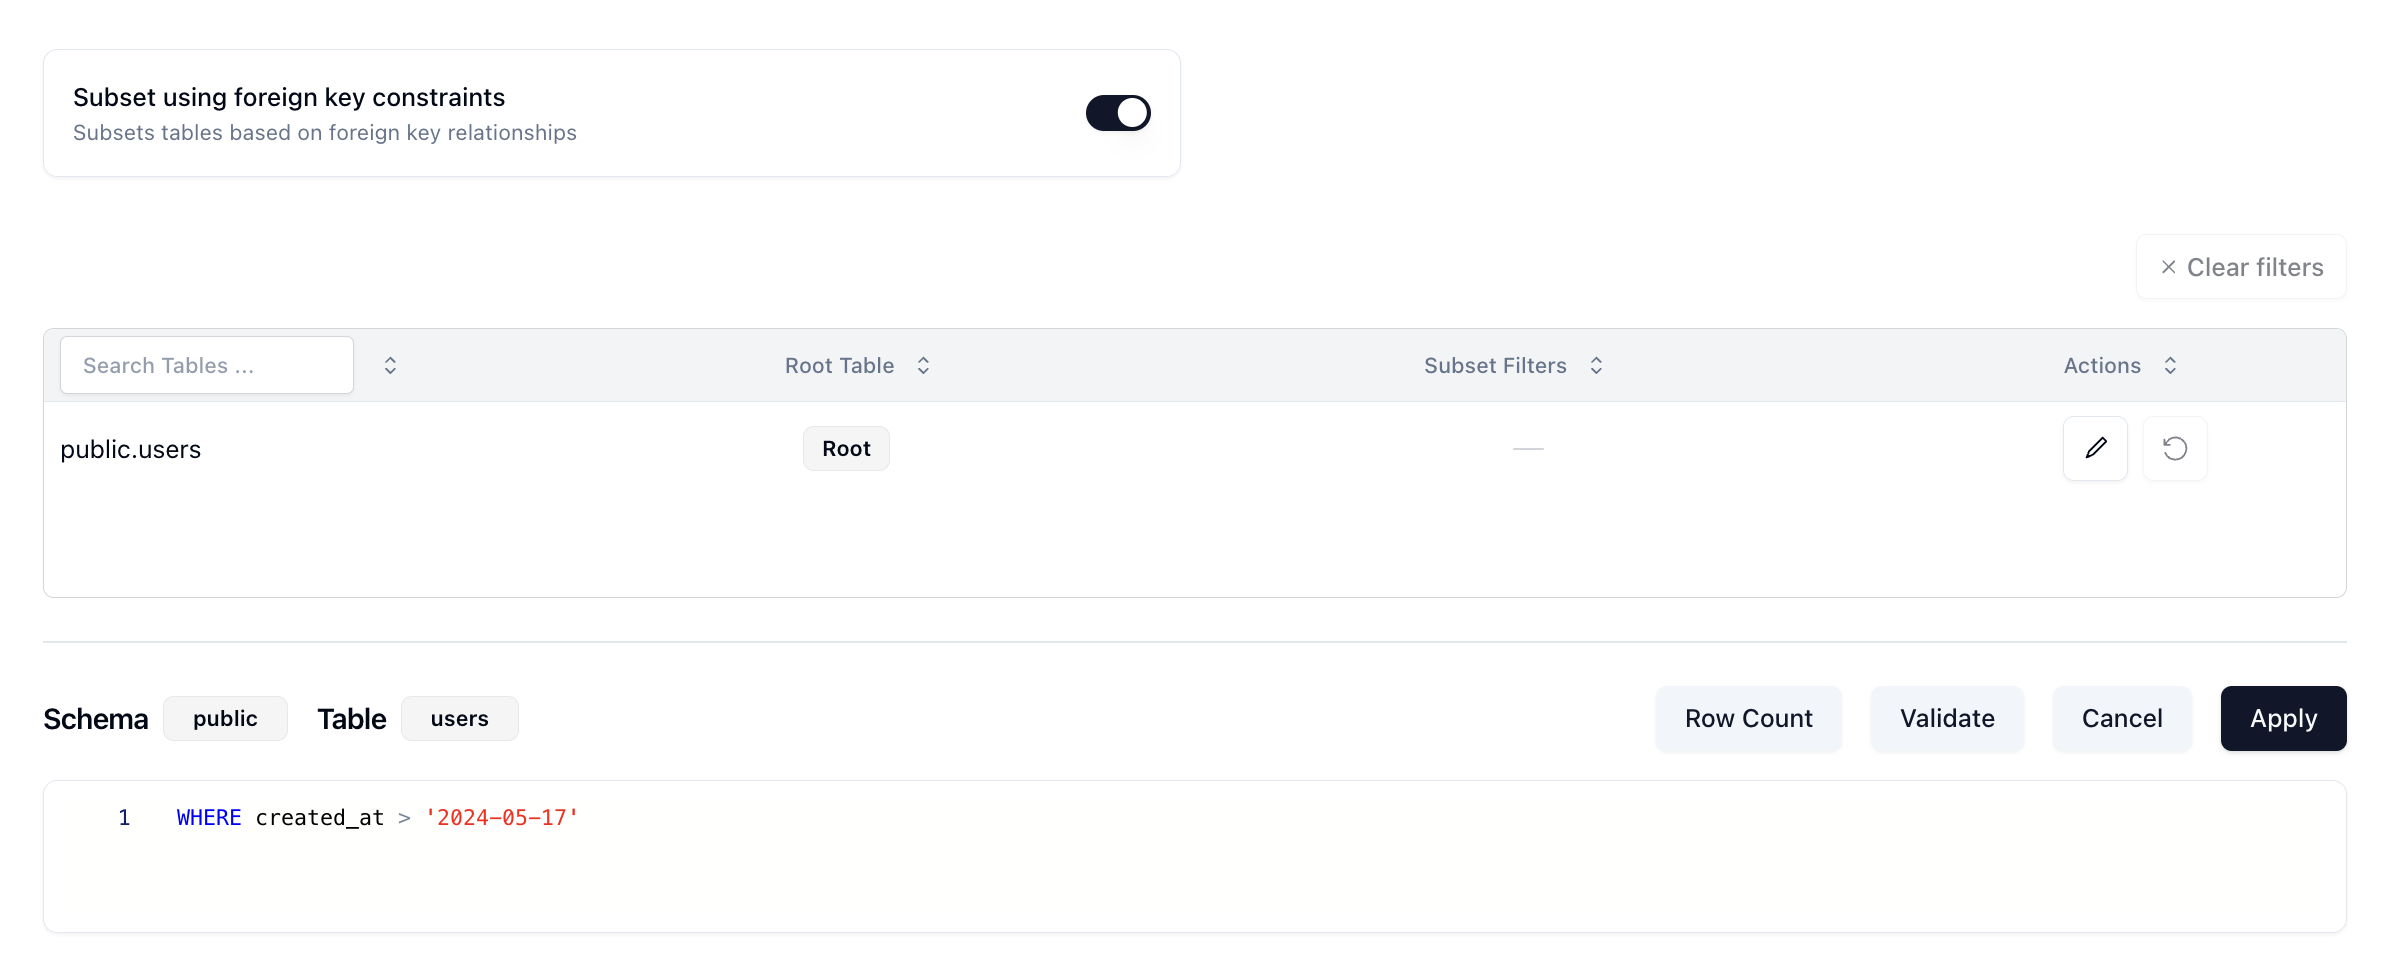
You can see in the Schema and Table badges above the query, the users table in the public schema is selected. There is a sort of hidden friction point here though. Since you're doing this in the Neosync web application, you would likely have to toggle back and forth between Neosync and your DB to see which columns you want to filter by. So we wanted to see if we could also autocomplete the column names. This would make it easier and faster for developers to write their queries without having to toggle back and forth between two systems.
Neosync's backend is written in Go and the front-end is written in React/Typescript in a NextJS framework. So that was pretty much already decided for us. The big thing we had to decide was - what are we going to use as a SQL editor?
There are a ton of options here to choose from depending on exactly what you need. Here are some that we evaluated:
We pretty quickly eliminated the query builders (options 3, 4) because we felt like it was too much configuration and our users know how to write SQL so to force them into a query builder wouldn't be a good experience. Then it came down to options 1, 2 and 5. We generally don't want to build something custom unless there is absolutely no other option that will work and in this case there were a few other options. So we sent option 5 to the backlog.
Option 1 wasn't a bad option but it didn't have native auto-complete which we wanted so we went with option 2 - Monaco. Monaco is actually the underlying editor that powers VSCode, is highly customizable and met all of our requirements.
The first thing we tackled were the validation options.
In order to validate that the query will successfully execute, we construct a SELECT statement using the filters that the user provides and then execute that statement as a prepared statement against the target database.
Here is what it looks like on the front-end:
 async function onValidate(): Promise<void> {
    const pgSting = `select * from "${item?.schema}"."${item?.table}" WHERE ${item?.where};`;
    const mysqlString = `select * from \`${item?.schema}\`.\`${item?.table}\` WHERE ${item?.where};`;

    try {
      const resp = await validateSql(
        account?.id ?? '',
        connectionId,
        dbType == 'mysql' ? mysqlString : pgSting
      );
      setValidateResp(resp);
    } catch (err) {
      setValidateResp(
        new CheckSqlQueryResponse({
          isValid: false,
          errorMessage: getErrorMessage(err),
        })
      );
    }
  }
It's an async function that, depending on if the database is a Postgres or Mysql database, constructs the correct sql statement and then calls the validateSql function which is a NextJS route that calls our backend. Then once it has a response, it sets that to the setValidateResp state variable. One thing to point out is how we're escaping the quotes in Mysql but not Postgres. The fun part of supporting multiple database types.
And secondly, the backend:
func (s *Service) CheckSqlQuery(
	ctx context.Context,
	req *connect.Request[mgmtv1alpha1.CheckSqlQueryRequest],
) (*connect.Response[mgmtv1alpha1.CheckSqlQueryResponse], error) {
	logger := logger_interceptor.GetLoggerFromContextOrDefault(ctx)
	logger = logger.With("connectionId", req.Msg.Id)
	connection, err := s.GetConnection(ctx, connect.NewRequest(&mgmtv1alpha1.GetConnectionRequest{Id: req.Msg.Id}))
	if err != nil {
		return nil, err
	}

	conn, err := s.sqlConnector.NewDbFromConnectionConfig(connection.Msg.Connection.ConnectionConfig, nil, logger)
	if err != nil {
		return nil, err
	}

	db, err := conn.Open()
	if err != nil {
		return nil, err
	}
	defer func() {
		if err := conn.Close(); err != nil {
			logger.Error(fmt.Errorf("failed to close connection: %w", err).Error())
		}
	}()
	tx, err := db.BeginTx(ctx, &sql.TxOptions{ReadOnly: true})
	if err != nil {
		return nil, err
	}
	defer nucleusdb.HandleSqlRollback(tx, logger)

	_, err = tx.PrepareContext(ctx, req.Msg.Query)
	var errorMsg *string
	if err != nil {
		msg := err.Error()
		errorMsg = &msg
	}
	return connect.NewResponse(&mgmtv1alpha1.CheckSqlQueryResponse{
		IsValid:      err == nil,
		ErrorMessage: errorMsg,
	}), nil
}
This is an rpc call that:
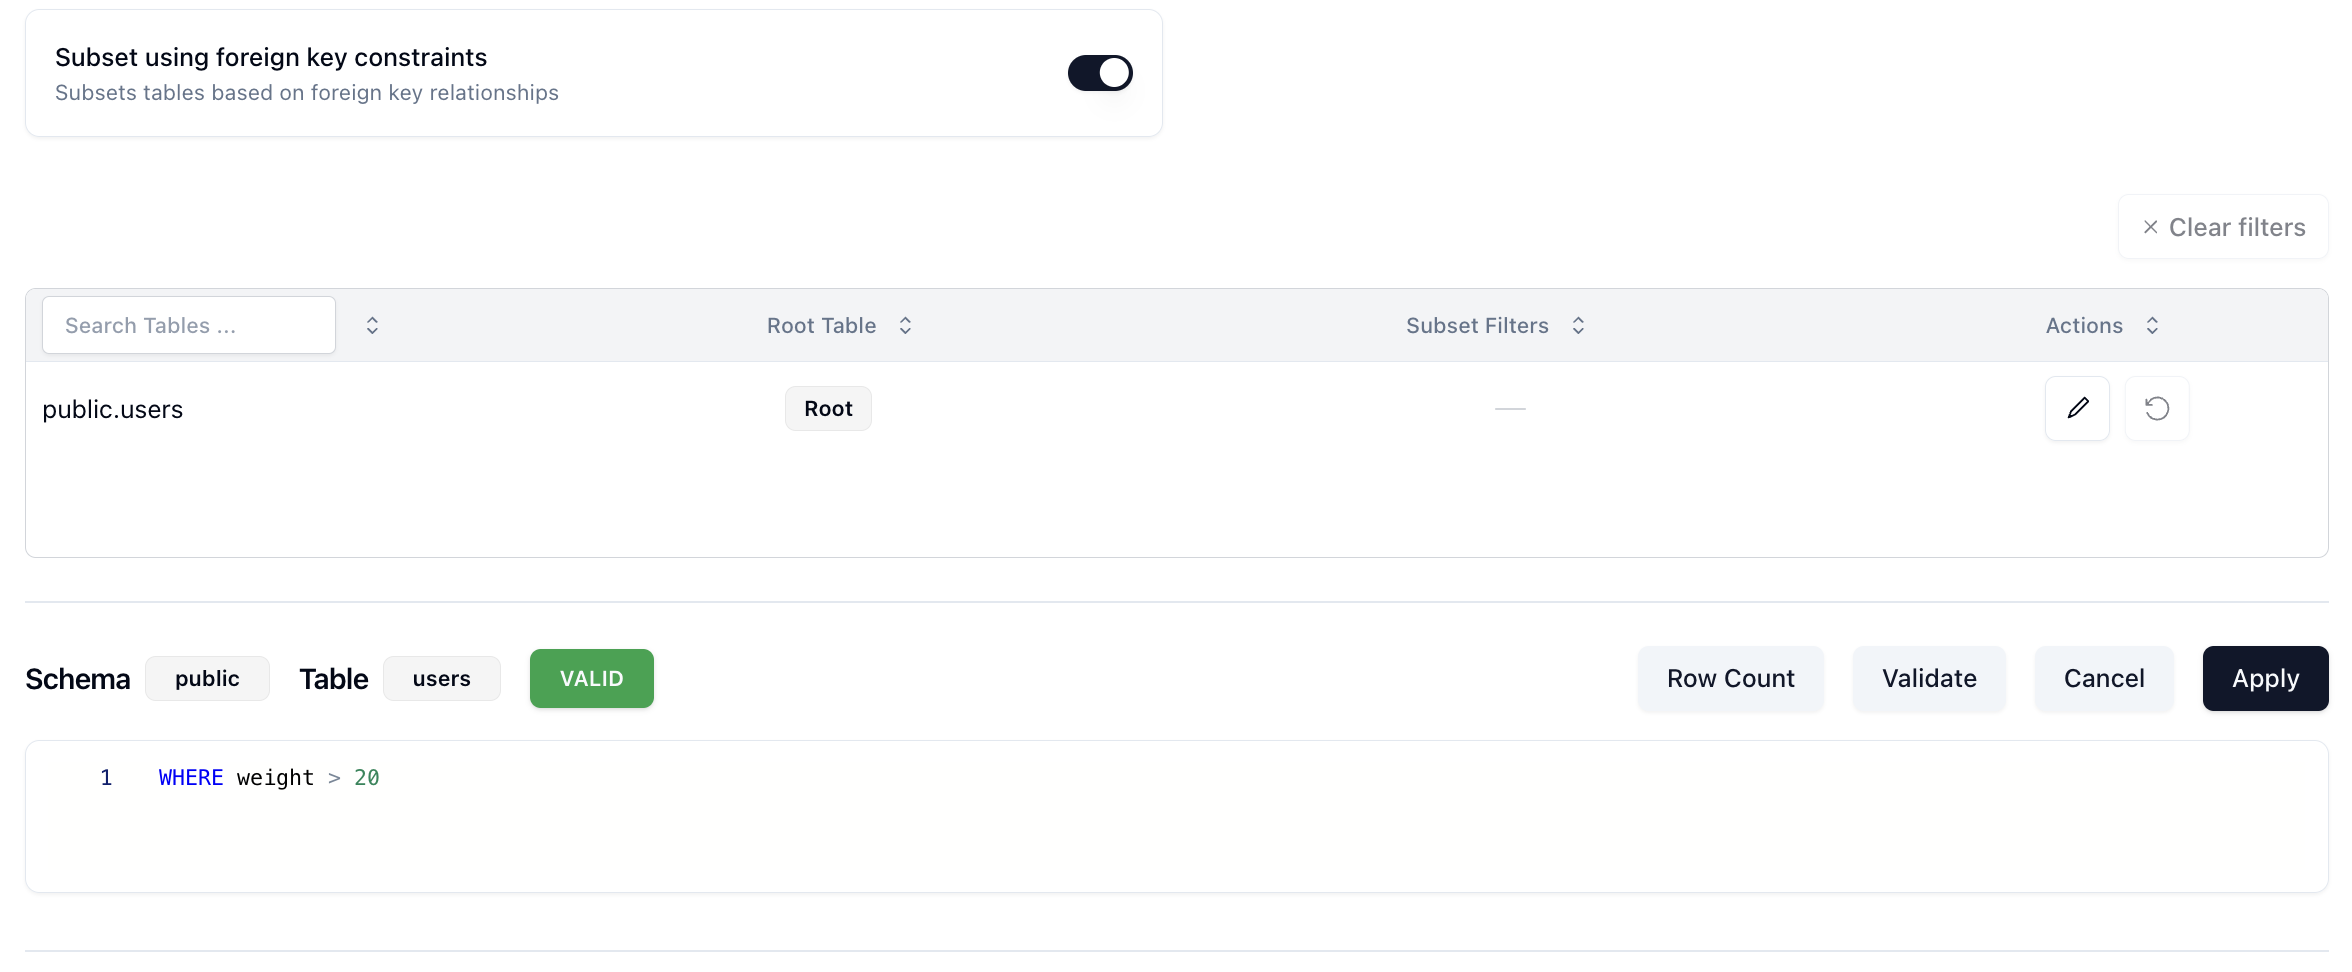
If it's successful, we'll see a green Valid notification:
if it's not successful, we'll get a red Invalid notification and a reason why:

Nice. This meets our requirement of being able to tell the user if the query will actually execute. But that's the first part.
Now that we know our query will run, how can we validate that it is subsetting data in the way that we want it to. This is much harder because it isn't a binary outcome. The query could work but it might do something unexpected. We felt like a good upgrade from where we were was to return the row count of the table that we're subsetting. It's not perfect, but generally most developers have some intuition about what their data looks like and a row count is a good directional indicator if things are working.
Let's check out the front-end:
  async function onGetRowCount(): Promise<void> {
    try {
      setTableRowCountResp(undefined);
      setCalculatingRowCount(true);
      const resp = await getTableRowCount(
        account?.id ?? '',
        connectionId,
        item?.schema ?? '',
        item?.table ?? '',
        item?.where
      );
      setTableRowCountResp(resp);
      setRowCountError('');
    } catch (err) {
      setCalculatingRowCount(false);
      console.error(err);
      setRowCountError(getErrorMessage(err));
    } finally {
      setCalculatingRowCount(false);
    }
  }
Similar to our validation function above, this is an async function that calls a NextJS route which then calls our backend. There are a few state variables that we're using to manage the loading, response and error states as well.
Let's check out the backend.
func (s *Service) GetTableRowCount(
	ctx context.Context,
	req *connect.Request[mgmtv1alpha1.GetTableRowCountRequest],
) (*connect.Response[mgmtv1alpha1.GetTableRowCountResponse], error) {
	logger := logger_interceptor.GetLoggerFromContextOrDefault(ctx)
	connection, err := s.connectionService.GetConnection(ctx, connect.NewRequest(&mgmtv1alpha1.GetConnectionRequest{
		Id: req.Msg.ConnectionId,
	}))
	if err != nil {
		return nil, err
	}

	_, err = s.verifyUserInAccount(ctx, connection.Msg.Connection.AccountId)
	if err != nil {
		return nil, err
	}

	connectionTimeout := 5
	db, err := s.sqlmanager.NewSqlDb(ctx, logger, connection.Msg.GetConnection(), &connectionTimeout)
	if err != nil {
		return nil, err
	}
	defer db.Db.Close()

	count, err := db.Db.GetTableRowCount(ctx, req.Msg.Schema, req.Msg.Table, req.Msg.WhereClause)
	if err != nil {
		return nil, err
	}

	return connect.NewResponse(&mgmtv1alpha1.GetTableRowCountResponse{
		Count: count,
	}), nil
}
Our backend rpc call first verifies that the user is in the account and can execute this call, then it creates a new SqlDb instance and calls the GetTableRowCount function on the db interface. That call looks like this:
func (p *PostgresManager) GetTableRowCount(
	ctx context.Context,
	schema, table string,
	whereClause *string,
) (int64, error) {
	tableName := sqlmanager_shared.BuildTable(schema, table)
	builder := goqu.Dialect(sqlmanager_shared.PostgresDriver)
	sqltable := goqu.I(tableName)

	query := builder.From(sqltable).Select(goqu.COUNT("*"))
	if whereClause != nil && *whereClause != "" {
		query = query.Where(goqu.L(*whereClause))
	}
	sql, _, err := query.ToSQL()
	if err != nil {
		return 0, err
	}
	var count int64
	err = p.pool.QueryRow(ctx, sql).Scan(&count)
	if err != nil {
		return 0, err
	}
	return count, err
}
We use the goqu open source project to build our sql queries. It has a bunch of nice, built-in features that make our lives a lot easier, so we use it throughout our backend. In this function, we're building a SELECT COUNT(*) statement with the filters that the user specified in their subset to get the count for that table and return it. Eventually that number surfaces back to the front-end like this:

This gives users a directional idea if their query is subsetting correctly without ever having to run their job. We expect to upgrade this over time as well.
Once we wrapped up the validation logic, we turned the Monaco and the sql editor. Let's first take a look at the component and it's props and then we can go through the functions that support it.
<Editor
  height="60px"
  width="100%"
  language="sql"
  value={constructWhere(item?.where ?? '')}
  theme={resolvedTheme === 'dark' ? 'vs-dark' : 'light'}
  onChange={(e) => onWhereChange(e?.replace('WHERE ', '') ?? '')}
  options={editorOptions}
/>
We first define the height and width of the Editor component so that it fits our page. Next, we define the language. Luckily, Monaco makes this really simple and all you have to do is write in the language and Monaco handles all of the syntax highlighting. Next is the value, this is the actual text in the editor. Here we wrote a custom function called constructWhere() which constructs the WHERE clause that a user will write. Next, we define our themes for light and dark mode. There are a ton of themes that Monaco supports, but we went with the basic VScode themes. Then we define an onChange() function that fires every time there is a keystroke or change to the editor. Lastly, we define some options for the editor.
Now let's check out the code that supports this component. First, we have a hefty useEffect() that runs when the Monaco component mounts and handles a lot of the logic.
const monaco = useMonaco();

useEffect(() => {
  if (monaco) {
    const provider = monaco.languages.registerCompletionItemProvider('sql', {
      triggerCharacters: [' ', '.'], // Trigger autocomplete on space and dot

      provideCompletionItems: (model, position) => {
        const textUntilPosition = model.getValueInRange({
          startLineNumber: 1,
          startColumn: 1,
          endLineNumber: position.lineNumber,
          endColumn: position.column,
        });

        const columnSet = new Set() < string > columns;

        // Check if the last character or word should trigger the auto-complete
        if (!shouldTriggerAutocomplete(textUntilPosition)) {
          return { suggestions: [] };
        }

        const word = model.getWordUntilPosition(position);

        const range = {
          startLineNumber: position.lineNumber,
          startColumn: word.startColumn,
          endLineNumber: position.lineNumber,
          endColumn: word.endColumn,
        };

        const suggestions = Array.from(columnSet).map((name) => ({
          label: name, // would be nice if we could add the type here as well?
          kind: monaco.languages.CompletionItemKind.Field,
          insertText: name,
          range: range,
        }));

        return { suggestions: suggestions };
      },
    });
    /* disposes of the instance if the component re-renders, otherwise the auto-complete list just keeps appending the column names to the auto-complete, so you get like 20 'address' entries for ex. then it re-renders and then it goes to 30 'address' entries
     */
    return () => {
      provider.dispose();
    };
  }
}, [monaco, columns]);
There are two main things to call out here. The first is that we create a provider using the Monaco react SDK which allows us to specify trigger characters for the autocomplete. We specify a space and . as our autocomplete triggers. This means that anytime types in something like <table>. that will trigger the autocomplete. Along with any spaces. As part of the provider, we also create a provideCompletionItems() function, which further defines the autocomplete logic. In this case, it should be triggered right as the user starts to type (as noted by the startLineNumber and startColumn fields).
The second is the shouldTriggerAutocomplete() function. Here is the code for that:
function shouldTriggerAutocomplete(text: string): boolean {
const trimmedText = text.trim();
const textSplit = trimmedText.split(/\s+/);
const lastSignificantWord = trimmedText.split(/\s+/).pop()?.toUpperCase();
const triggerKeywords = ['SELECT', 'WHERE', 'AND', 'OR', 'FROM'];

if (textSplit.length == 2 && textSplit[0].toUpperCase() == 'WHERE') {
  /* since we pre-pend the 'WHERE', we want the autocomplete to show up for the first letter typed
   which would come through as 'WHERE a' if the user just typed the letter 'a'
   so the when we split that text, we check if the length is 2 (as a way of checking if the user has only typed one letter or is still on the first word) and if it is and the first word is 'WHERE' which it should be since we pre-pend it, then show the auto-complete */
  return true;
} else {
  return (
    triggerKeywords.includes(lastSignificantWord || '') ||
    triggerKeywords.some((keyword) => trimmedText.endsWith(keyword + ' '))
  );
}
}
This effectively defines when we want to trigger the autocomplete. We define that we want to trigger it after some trigger keywords where someone would naturally start typing in a column name.
Lastly, back to our useEffect(), we create our suggestions array from our column set and map that to the correct object that Monaco expects so that we can render it.
All in all, it looks like this:
Where weight is one of the columns in the users table.
And that's pretty much how we implemented our SQL editor for our subsetting feature. It was a combination of giving the user a way to validate their queries and a better authoring experience. All in all, we've gotten a lot of really positive feedback on it especially the column auto-fill. There's a lot more that we want to add to this as well in the next iteration. Columns types would be really nice to add as well as a total table count pre-subset, to just name a few.
If you want to check out the all of the code for this feature, you can find the main EditAction.tsx file here.
Top Open Source Alternatives to Tonic AI for Data Anonymization and Synthetic Data
March 31st, 2025

Top 4 Alternatives to Tonic AI for Data Anonymization and Synthetic Data Generation
March 25th, 2025